Quasar 自定义一个调色板输入框
Quasar 自定义一个调色板输入框
需求
使用 QInput 选择颜色并预览。
利用 color picker,但只显示调色板,且调色板颜色为 Quasar 的 css variable 支持的所有颜色。
自定义调色板
颜色列表
首先,我们需要获取 Quasar 支持的颜色变量列表。这个在 quasar/dist/types/api/color.d.ts 中有定义:
// color.d.ts
export type BrandColor =
  | "primary"
  | "secondary"
  | "accent"
  | "dark"
  | "positive"
  | "negative"
  | "info"
  | "warning";
type Color =
  | "red"
  | "pink"
  | "purple"
  | "deep-purple"
  | "indigo"
  | "blue"
  | "light-blue"
  | "cyan"
  | "teal"
  | "green"
  | "light-green"
  | "lime"
  | "yellow"
  | "amber"
  | "orange"
  | "deep-orange"
  | "brown"
  | "grey"
  | "blue-grey";
type ColorShade = 1 | 2 | 3 | 4 | 5 | 6 | 7 | 8 | 9 | 10 | 11 | 12 | 13 | 14;
type DetailedColor = `${Color}-${ColorShade}`;

export type NamedColor = LiteralUnion<
  BrandColor | Color | DetailedColor | keyof CustomColors
>;
其中 BrandColor 没有变体,Color 根据 ColorShade 有 14 种变体组合成 DetailedColor。(写完时才发现其实包括颜色原型应该是 15 个变体,所以展示的图片只有 14 列)
然后可以仿照着写一下所有颜色组合得到的颜色列表。因为是全局变量,我就直接放在 store 里了。
import { colors } from "quasar";

export const useColorStore = defineStore("color", () => {
  const brandColors = [
    "primary",
    "secondary",
    "accent",
    "dark",
    "positive",
    "negative",
    "info",
    "warning",
  ];
  const colorList = [
    "red",
    "pink",
    "purple",
    "deep-purple",
    "indigo",
    "blue",
    "light-blue",
    "cyan",
    "teal",
    "green",
    "light-green",
    "lime",
    "yellow",
    "amber",
    "orange",
    "deep-orange",
    "brown",
    "grey",
    "blue-grey",
  ];

  const colorShades = [1, 2, 3, 4, 5, 6, 7, 8, 9, 10];

  const allColors = brandColors.concat(
    colorList.flatMap((c) => [c].concat(colorShades.map((t) => `${c}-${t}`)))
  );

  const palette: string[] = allColors.map(colors.getPaletteColor);

  return { palette };
});
可以 console.log 输出一下。
Proxy(Array) {0: '#1976d2', 1: '#26a69a', 2: '#9c27b0', 3: '#1d1d1d', 4: '#21ba45', 5: '#c10015', 6: '#31ccec', 7: '#f2c037', 8: '#ffebee', 9: '#ffcdd2', 10: '#ef9a9a', 11: '#e57373', 12: '#ef5350', 13: '#f44336', 14: '#e53935', 15: '#d32f2f', 16: '#c62828', 17: '#b71c1c', 18: '#fce4ec', 19: '#f8bbd0', 20: '#f48fb1', 21: '#f06292', 22: '#ec407a', 23: '#e91e63', 24: '#d81b60', 25: '#c2185b', 26: '#ad1457', 27: '#880e4f', 28: '#f3e5f5', 29: '#e1bee7', 30: '#ce93d8', 31: '#ba68c8', 32: '#ab47bc', 33: '#9c27b0', 34: '#8e24aa', 35: '#7b1fa2', 36: '#6a1b9a', 37: '#4a148c', 38: '#ede7f6', 39: '#d1c4e9', 40: '#b39ddb', 41: '#9575cd', 42: '#7e57c2', 43: '#673ab7', 44: '#5e35b1', 45: '#512da8', 46: '#4527a0', 47: '#311b92', 48: '#e8eaf6', 49: '#c5cae9', 50: '#9fa8da', 51: '#7986cb', 52: '#5c6bc0', 53: '#3f51b5', 54: '#3949ab', 55: '#303f9f', 56: '#283593', 57: '#1a237e', 58: '#e3f2fd', 59: '#bbdefb', 60: '#90caf9', 61: '#64b5f6', 62: '#42a5f5', 63: '#2196f3', 64: '#1e88e5', 65: '#1976d2', 66: '#1565c0', 67: '#0d47a1', 68: '#e1f5fe', 69: '#b3e5fc', 70: '#81d4fa', 71: '#4fc3f7', 72: '#29b6f6', 73: '#03a9f4', 74: '#039be5', 75: '#0288d1', 76: '#0277bd', 77: '#01579b', 78: '#e0f7fa', 79: '#b2ebf2', 80: '#80deea', 81: '#4dd0e1', 82: '#26c6da', 83: '#00bcd4', 84: '#00acc1', 85: '#0097a7', 86: '#00838f', 87: '#006064', 88: '#e0f2f1', 89: '#b2dfdb', 90: '#80cbc4', 91: '#4db6ac', 92: '#26a69a', 93: '#009688', 94: '#00897b', 95: '#00796b', 96: '#00695c', 97: '#004d40', 98: '#e8f5e9', 99: '#c8e6c9', …}根据上述自定义的调色板,写一个包装过的 QColor 组件:
<template>
  <q-color
    v-model="hex"
    no-footer
    default-view="palette"
    :palette="paddedPalette"
    style="width: 200px"
  />
</template>

<script setup lang="ts">
import { useColorStore } from "@/stores/color";

const { palette } = useColorStore();
const paddedPalette = [...palette.slice(0, 8), null, null, ...palette.slice(8)];
const hex = ref(palette[0]);
</script>
其中 paddedPalette 是希望 brand color 在单独一行显示。当颜色为 null 时,就不会在调色板上显示。
效果如下。
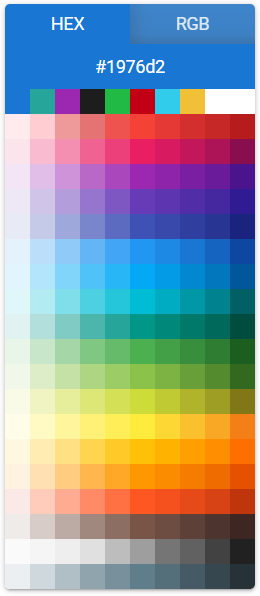
展示更多颜色
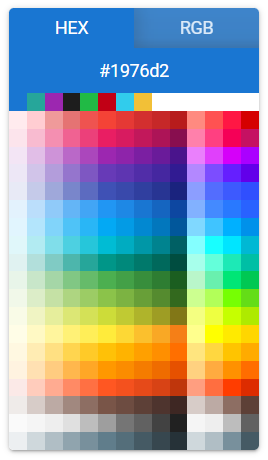
但是 10 种颜色是不够的,我们希望增加到 15 种。直接更改上述代码中的 colorShades 会得到这样的画面:

但不幸的是,Quasar 并没有提供设置调色板每行数量的 API。那么每行色块数量是由什么控制的呢?注意到:

原来是 CSS 决定的!10% 就表明每个占一行的 10%,也就是 1 行能放 10 个。
而这是在哪定义的呢?我们来看一下 quasar/src/components/color/QColor.sass:
// QColor.sass
.q-color-picker
  &__cube
    padding-bottom: 10%
    width: 10% !important
这里写死了每个小方块的宽度和高度,都是 10%。
但这并不妨碍我们覆盖这个样式。
<template>
  <q-color
    v-model="hex"
    no-footer
    default-view="palette"
    class="my-color-picker"
    :palette="paddedPalette"
    style="width: 200px"
  />
</template>

<script setup lang="ts">
import { useColorStore } from "@/stores/color";

const { palette } = useColorStore();
const paddedPalette = [
  ...palette.slice(0, 8),
  ...new Array(7),
  ...palette.slice(8),
];

const hex = ref(palette[0]);
</script>

<style lang="scss">
.my-color-picker {
  .q-color-picker__cube {
    padding-bottom: calc(100% / 14);
    width: calc(100% / 14) !important;
  }
}
</style>
上面定义了一个 my-color-picker class,对其中的 .q-color-picker__cube,覆盖 padding-bottom 和 width,使用 calc() 完成计算。
注意不能用 scoped,因为不会给自动生成的元素注入 data-v- 属性,会导致样式应用无效。
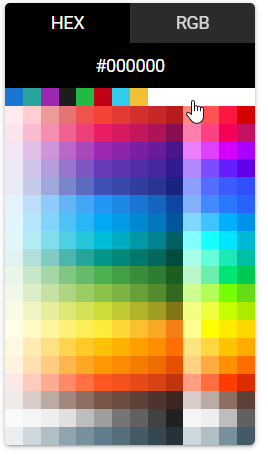
禁用鼠标事件
但是会发现一个问题:无效的方块照样能够点击,并且会导致颜色设为 #000000,而这不是我们希望的。
观察 DOM,发现颜色值为 null 的元素没有设置 style 属性。
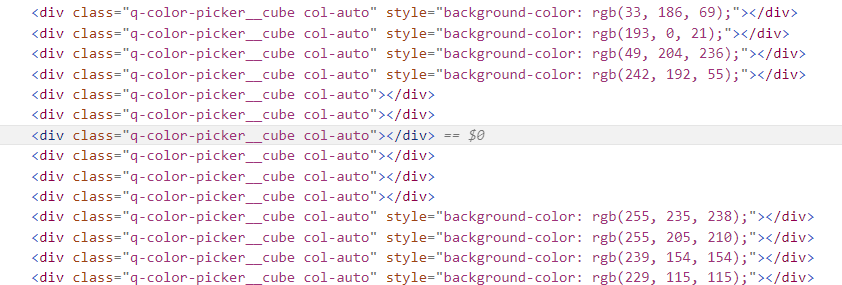
那么解决方法就很明显了,禁掉这些没有设置 style 的元素的鼠标事件。使用 :not(style) 来选择不具有 attribute 名为 style 的元素,加上 pointer-events: none。
此外,为了防止用户修改输入框(因为可选的颜色的固定的,不能扩展),对 input 元素也要加上这个样式。
.my-color-picker {
  .q-color-picker__cube {
    padding-bottom: calc(100% / 14);
    width: calc(100% / 14) !important;
    &:not([style]) {
      pointer-events: none;
    }
  }
  input {
    pointer-events: none;
  }
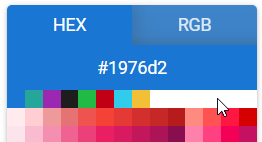
}
效果如下,可以解决问题。
包装输入框
根据组件教程,可以很容易地包装一下上面的颜色选择器。
因为不需要用户输入,使用了 QField 代替 QInput。
<template>
  <q-field dense :standout="`bg-${hexToPalette[hex]} text-${contrastBW(hex)}`">
    <template #control>
      <q-badge :color="hexToPalette[hex]" :text-color="contrastBW(hex)">
        {{ hex }}
      </q-badge>
    </template>
    <template #append>
      <q-icon name="colorize" class="cursor-pointer">
        <q-popup-proxy cover transition-show="scale" transition-hide="scale">
          <q-color
            v-model="hex"
            no-footer
            default-view="palette"
            class="my-color-picker"
            :palette="paddedPalette"
            style="width: 200px"
          />
        </q-popup-proxy>
      </q-icon>
    </template>
  </q-field>
</template>
这里用了 standout 风格,感觉更加贴合,而且点击可以在整个框的范围内显示颜色(如右图)。这个 QBadge 需要放在 control 区,不然会被上下拉长。
展示效果如下:


完工!


